Pages - Menu

Showing posts with label halloween craft ideas. Show all posts

Aug 23, 2016

HALLOWEEN THEMED MINI MASON JARS PLUS PUMPKIN MAGNETS


I've really been in the Halloween/Fall mood this week. And these Halloween themed Mason jars with Pumpkin magnets are a great way to give treats without the use of bags.

Or just a fun way to spruce up any area with a bit of primitive Halloween fun.
And as a bonus, the top, 

the pumpkin face is a refrigerator magnet!


Okay, so on to how to make these.
I stained my jars on the outside, here's the link to how I do that.
 I do the staining because I am in love with various colors that are hard to find.

Here is a pic of my orange, hand stained jar:
CLICK TO SEE HOW TO STAIN MASON JARS
 
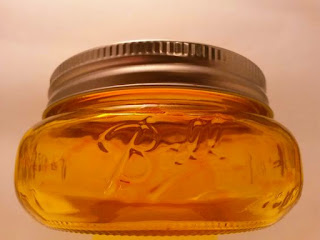
But I'm sure you could just paint the outside of the jar with a sponge and some craft paint if you wanted. As long as maybe sealing it with a clear coat to save from chipping.

After that, I just got out some craft paint in browns, and painted the shiny lid and ring. 
 The one that will screw onto the jar, not the pumpkin magnet.
I like the burnt umber color a lot.

And then I tied some jute string around the jar with a cute, hand stamped tag. I chose BOO.
 Here it is with the painted lid on it. I had to do two coats of burnt umber.

And then I just stuck on the Pumpkin magnet lid to the top of the jar lid.


And this is how they turned out:
As you see, I also glued a bit of homespun fabric to the pumpkin magnet lid, along with a cute button.
I also added a bit of cinnamon on top of the face, which I sprinkled on top of some Elmers glue. Just to get it to set in.

They are all ready to stuff with candy. 

And remember, since I stain the outside, these jars are food safe.  And since the stain is baked on, they are even safe for washing. Though I'd avoid the dishwasher just in case.

Hope ya'll like these little mini mason jar all decked out for Halloween!
See ya'll later,
-Lisa


SUPPLIES:
I buy the mini Mason jars at Walmart in the canning section.
And the magnets and craft paint I also get at Walmart in the craft section.
The jute twine came from the Dollar Mart and I made my own handstamped tags from the plain Avery tags I found online at eBay.
The swatch of fabric came from my oodles of fabric I've saved over the years. ;-)

Aug 22, 2016

HARVEST WELCOME BOARD


Yesterday I spent the evening making a "porch board." It's just a tall sign that is meant to stand by your entry, out of the way, to welcome guests.
Since Fall is on it's way, I thought I'd make one to say "Harvest Welcome," to place in my new booth.

Here was my plain old wooden fence board before and after:


I ended up using the other side that didn't have the light colored streaks. First I took some cinnamon orange colored craft paint and a wide paint brush and started to freehand the letters.

I didn't know how much space I'd have in the end, but I started by doing the first word, "HARVEST."


And I knew if I did have enough room that I wanted to also write "WELCOME" to the end, for "HARVEST WELCOME."
Most people will lay it out, but I just don't really take the time for that anymore. I knew I could always cut it off the bottom if there was too much room left, or fill it in with something.

Yep, that's a hammock on my side porch. I love it there. lol
The wide paint brush makes it easy to freehand these type of letters.

Or if you don't fell good with free handing  them, print you off large letters using Word in whichever font you like and just trace them real hard onto your board to give you an outline.

CLICK HERE TO SEE AN EASIER WAY TO TRANSFER WORDS TO WOOD

After the wide orange letters were done, I went back in with a country tan color and outlined a fine line around each letter.  I used a very fine tip paint brush that is actually meant for decorating nails. It works perfect.

Once it was all painted it, I did have some room at the bottom left over but not too much. I decided to just draw in a pumpkin to fill it in.


And there's some grapevine garland I was about to use also to trim it up.

Look how cool the grapevine twirled up at the bottom to form a cute little pumpkin!
 I left the extra hanging as a stem also.

Here's a shot from the side, hard to get a good pic cause the board is so long.


As you see, I just ran the grapevine garland from the top down the sides and to the bottom.

I loved how the grapevine was making it look that far.

And here it is sitting beside my door:


I like how it takes up that empty space that really doesn't have much room for anything else.
And now seeing it sitting there, in a pic, I think I'm going to go back and add a touch of burlap to the top.

Here's a few other pics of how I've started decorating the porch already. Since we had a bit of a cool down spell yesterday, it has really gotten me in the mood.


I'll probably keep this porch board for myself, but I'm off to make a few more in the same theme for my booth right now. I think I will probably price them for $19.99 each.....or um, maybe $15.00.

Anyways, hope ya'll got some sort of idea from this post.  And now I'm off to add a bit of burlap to the top of the board someway.  After seeing the pic here, it looks like it just needs something there.
Happy Crafting,
-Lisa

Sep 14, 2015

Mason Jar Lid Pumpkin Magnets


MASON JAR LID PUMPKIN MAGNETS


 I am still gearing up for the holidays just around the bin.  And my craft booth really needs some more goodies to get shoppers in the mood.  So here are some Halloween themed refrigerator magnets that I made using some old, leftover mason jar lids.

(Click here to see the pumpkin and wreath made from the mason jar rings.)
 

Making the Mason Jar lid pumpkin magnets is a pretty simple craft but really kinda fun.

You need just the basics of crafts including:
- Mason Jar Lids (regular size and large mouth is what I used)
-Craft Paint: Black and Orange Cinnamon
-E-6000 Glue
-Round Magnets 


Just take your plain, shiny lids and give them a base coat of black

And then do a second of a orange color. I chose Cinnamon in the Apple Barrel line.
I just used a makeup sponge and kinda dob it on to give it a more worn look like so.
See how the top one looks way cuter? I love it way better than the plain orange one I tried on the bottom. On it, I just went back and dobbed on some black paint with a sponge to make it more cuter too.


Then I started painting on some pumpkin faces. Just some basic ones at first.

And then I got a little different now and then and added a "Boo" and a "Scarecrow" face.


And then it was time to glue on the magnets to the back with the E-6000 glue.

These are the 3/4" Button Magnets from Walmart that cost about $3.00 for a pack of 52.
These two together make a super strong hold!


Let the glue dry for about five or six hours because it is super strong once it gets a good drying.
And it will hold quite a few pieces of paper to your refrigerator too.


And then there you have them, they are all ready to go.


I think I am going to package these up and price them for maybe 2 for $1.00?
Do you think that price is fair enough?
 I know they will look way cuter when they get in the packaging and I try to price stuff so that I won't loose money on the packaging materials either.

*
I forgot to mention one thing. I am also going back and adding a touch of straw here and there and homespun in the corners. I will update soon with those pics. I was just in a bit of a hurry to share these and got ahead of myself. lol
*


 Hope you liked these little Pumpkin magnets made out of ole' Mason jar lids.
See ya'll next time,
~Lisa 

Aug 20, 2015

HALLOWEEN CUPCAKE CANDLES with Free Linkup


Here's a little different spin I thought I'd try with some cute candles.
I call them Cupcake Candles.

I had some candy corn style candles left over from my craft booth sales, and I was trying to find a way to re-do them to sale again.  And then I thought about making something with the cute Halloween cupcake papers I had on hand.
And then I thought, hum, what about some Halloween Cupcake Candles?
They'd be cute tucked on a kitchen shelf maybe.

Here's what I did. I took the cute little candy corn votives, (if you don't have this style,  you can easily paint your own on the plain white ones with some yellow and orange paint,) Halloween cupcake wrappers and dried pumpkin pods. And later a rusty lid that I made.

And glued them to the cupcake papers.  Just to hold them in place good. I used E-6000 glue from Walmart.

And then to dress them up, I tossed in the top, around the candle, some pumpkin putka pods.  

The pumpkin putka pds are used in primitive decorating for bowl fillers and crafts. I found mine on ebay from a wonderful lady's store called simple*gatherings. You get 4 cups for only $5.74. So it really goes a long way.
And then I took a bit of grapevine garland and made a circle big enough to hold it all.
I think I may sit this on a dark little saucer of some sort also on my shelf.

And then I thought I could do a little bit more and put these in some grungy, rusty jar lids I've previously made. (Later this week, I'm posting on how to grung up the entire Mason jars also.)
And here they are in the lids:
I added some more dried pumpkin pods,
And to kind of finish it off, I took (ripped) a sprig of one of my pip berry garlands, and tied it around the jar lid. They are made of coated wire, so they bend very easily.
And that is about it. So many ways you can really go about making these cupcake candles. I could have even put one of the cupcake, paper liners in the rusty lid too! I will on my next one.

Hope ya'll liked this little idea for the votives.  And remember, if you don't have the candy corn ones, just take the white, plain ones and paint a stripe of orange and yellow and BAM! You got'em.

See ya'll next time!
~Lisa