Pages - Menu

Showing posts with label halloween crafts. Show all posts

Oct 16, 2021

PUMPKINS from MASON JAR RINGS


MASON JAR RING PUMPKINS 


MASON JAR RING PUMPKINS
Hey ya’ll!
Time for some more Fall crafts to get us geared to the cooler months a comin’!
Here’s some cute pumpkins I recently made out of some old, leftover Mason Jar Rings.
It’s a pretty easy craft and all you really need is:
-Mason Jar Rings (save the lids too!)
-Twine
-An acorn
-Glue (I use E-6000 found at Walmart)
-Cinnamon colored paint (optional)
Okay, lets get out our Mason jar rings. 
Here’s my big ole wooden slat, bushel basket full of the ones I save:
If you don’t have any on hand, just grab a few boxes at any Dollar General or Walmart. They have tons in store now because it’s canning season. And they are only about $2.00 a box or so of 24.
Now grab you a roll of some type of twine or wire if you have any. I use this basic jute, twisted twine for about all of my crafts anymore. It is like $2.00 a roll at the Dollar General.

Alrighty, now on to the stringing of the lids.
Just basically just take a bunch of lids, facing the same way, and string them onto your twine.  Don’t cut your twine yet until you know how big you want to make your pumpkin.  
For one of my pumpkins I used the Large mouth rings and for the other smaller one, I used the regular size rings.
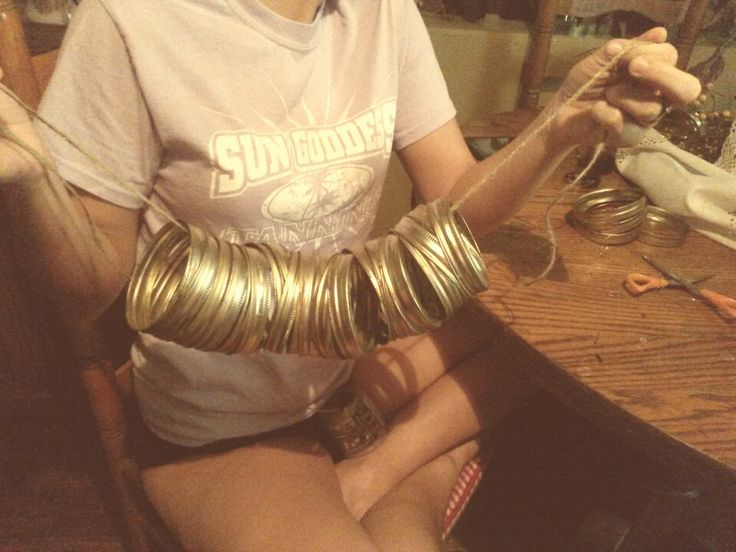
Here’s my sister holding it up for a pic.
It will probably take more than you are thinking of in your mind. Mine did. But the fuller it is, the better it looks.
After you get a bunch strung on it and rounded up how you like, just kinda tie the twine together to give it a strong hold.

Be sure to leave enough twine hanging out, before you cut it, to make as a cute looking vines!
And then just take you a pine cone and glue it in place right in the center top. 
 Make like a good stem.
You can buy a bag of pine cones and plastic pumpkins at the Dollar Mart right now for a $1.00. A cute variety bag!
And then just go and sort of dry brush you on some streaks of cinnamon colored craft paint to about every other ring.  Not too much color, just enough to give it a bit of something.  Kind of rub the brush off on some paper before using it.  Because you really don’t want too thick of a coat. Just kind of streak it on.
After this pic, I took my finger and rubbed off some of the orange to give it a more worn look.
And that is about all there is to this cute Mason Jar Ring Pumpkin craft!
Here’s a few more pics of them:

Hope ya’ll liked this cute little Mason Jar Ring Pumpkin idea. I wish I could take the credit for it, but I can’t. I first saw it on Pinterest.  
But whoever did come up with it first was a genius!
Have a craft related post you’d like to share in my linkup below? Share away! & See ya’ll next time,
~Lisa

Sep 1, 2017

HALLOWEEN MASON JAR LID ORNAMENTS


Hey Ya'll.
Who's in the mood for some Halloween Mason Jar Lid ornaments?
I know I sure am!

These stemmed off from the idea of my Snowman Mason Jar Lid ornaments you see below:
 SNOWMAN LID ORNAMENTS

 Here's how I made them in case you want to give it a go. 
If you don't have any on hand, here's how they look in boxes at Walmart.
started out with a bunch of plain ole, used, metal Mason Jar lids in two sizes of
Regular: 2 2/4"
Wide Mouth: 3 3/4"
Some were new and shiny, some old and rusty. It doesn't matter to me.
And I spray painted them a base color in various shades of green and maroon that I had on hand.
For the Fall ones I was doing today, I stuck with the Satin Green.
The white was used for speckling (snow) only because it's a cheaper can and doesn't cover good.
Here are the Rustoleum and Valspar that cover great in one coat:


After they dry, they are a flat, softer color. Then we're ready to get started painting with craft paint.
My favorite brand is Folk Art but I do have a lot of Apple Barrel on hand too.

I just kinda looked at some magazines I had on hand to get ideas of decorations for the pumpkins.
And then just free handed the rest. Any fall or Halloween themed ideas would work great on these!


After letting all the paint dry for a bit, I decided to start adding the wire hangers.

I happened to have a metal punch on hand, but you can easily use a hammer and a nail to punch a hole in each side for a wire.

Then I took some homespun pieces I had laying around, in as close a match as possible and just tied them on.

And here they are all ready to go in my co-op and my ebay shop.

On this pumpkin, I used Elmers Glue underneath a quick off white color to give the almost crackle look.


Happy Crafting Ya'll,
~Lisa

Aug 23, 2016

HALLOWEEN THEMED MINI MASON JARS PLUS PUMPKIN MAGNETS


I've really been in the Halloween/Fall mood this week. And these Halloween themed Mason jars with Pumpkin magnets are a great way to give treats without the use of bags.

Or just a fun way to spruce up any area with a bit of primitive Halloween fun.
And as a bonus, the top, 

the pumpkin face is a refrigerator magnet!


Okay, so on to how to make these.
I stained my jars on the outside, here's the link to how I do that.
 I do the staining because I am in love with various colors that are hard to find.

Here is a pic of my orange, hand stained jar:
CLICK TO SEE HOW TO STAIN MASON JARS
 
But I'm sure you could just paint the outside of the jar with a sponge and some craft paint if you wanted. As long as maybe sealing it with a clear coat to save from chipping.

After that, I just got out some craft paint in browns, and painted the shiny lid and ring. 
 The one that will screw onto the jar, not the pumpkin magnet.
I like the burnt umber color a lot.

And then I tied some jute string around the jar with a cute, hand stamped tag. I chose BOO.
 Here it is with the painted lid on it. I had to do two coats of burnt umber.

And then I just stuck on the Pumpkin magnet lid to the top of the jar lid.


And this is how they turned out:
As you see, I also glued a bit of homespun fabric to the pumpkin magnet lid, along with a cute button.
I also added a bit of cinnamon on top of the face, which I sprinkled on top of some Elmers glue. Just to get it to set in.

They are all ready to stuff with candy. 

And remember, since I stain the outside, these jars are food safe.  And since the stain is baked on, they are even safe for washing. Though I'd avoid the dishwasher just in case.

Hope ya'll like these little mini mason jar all decked out for Halloween!
See ya'll later,
-Lisa


SUPPLIES:
I buy the mini Mason jars at Walmart in the canning section.
And the magnets and craft paint I also get at Walmart in the craft section.
The jute twine came from the Dollar Mart and I made my own handstamped tags from the plain Avery tags I found online at eBay.
The swatch of fabric came from my oodles of fabric I've saved over the years. ;-)

Sep 14, 2015

Mason Jar Lid Pumpkin Magnets


MASON JAR LID PUMPKIN MAGNETS


 I am still gearing up for the holidays just around the bin.  And my craft booth really needs some more goodies to get shoppers in the mood.  So here are some Halloween themed refrigerator magnets that I made using some old, leftover mason jar lids.

(Click here to see the pumpkin and wreath made from the mason jar rings.)
 

Making the Mason Jar lid pumpkin magnets is a pretty simple craft but really kinda fun.

You need just the basics of crafts including:
- Mason Jar Lids (regular size and large mouth is what I used)
-Craft Paint: Black and Orange Cinnamon
-E-6000 Glue
-Round Magnets 


Just take your plain, shiny lids and give them a base coat of black

And then do a second of a orange color. I chose Cinnamon in the Apple Barrel line.
I just used a makeup sponge and kinda dob it on to give it a more worn look like so.
See how the top one looks way cuter? I love it way better than the plain orange one I tried on the bottom. On it, I just went back and dobbed on some black paint with a sponge to make it more cuter too.


Then I started painting on some pumpkin faces. Just some basic ones at first.

And then I got a little different now and then and added a "Boo" and a "Scarecrow" face.


And then it was time to glue on the magnets to the back with the E-6000 glue.

These are the 3/4" Button Magnets from Walmart that cost about $3.00 for a pack of 52.
These two together make a super strong hold!


Let the glue dry for about five or six hours because it is super strong once it gets a good drying.
And it will hold quite a few pieces of paper to your refrigerator too.


And then there you have them, they are all ready to go.


I think I am going to package these up and price them for maybe 2 for $1.00?
Do you think that price is fair enough?
 I know they will look way cuter when they get in the packaging and I try to price stuff so that I won't loose money on the packaging materials either.

*
I forgot to mention one thing. I am also going back and adding a touch of straw here and there and homespun in the corners. I will update soon with those pics. I was just in a bit of a hurry to share these and got ahead of myself. lol
*


 Hope you liked these little Pumpkin magnets made out of ole' Mason jar lids.
See ya'll next time,
~Lisa