Pages - Menu

Showing posts with label prims. Show all posts

Apr 1, 2015

TOBACCO STICK SHUDDERS


Here are the tobacco stick shudders up close.


Primitive Tobacco Stick Shudders

These are shudders that I made out of tobacco sticks.
Don't know what tobacco sticks are? Click here.

Since I have so many of them handy and they make for awesome primitive crafts, I've been trying to use them in all sorts of ways.

And these cute primitive shudders turned out pretty cute.
All you need to do is basically lay them out in a line, kinda find the straightest ones then cut to same size. It only takes about 5 wide.
Next, just take a piece of the cut off sections and lay them sideways on the front to kind of brace them all together. 
I had my husband take a nail gun and sink the nails way in so that they aren't seen much from the front.
On the back though, you will have to take wire cutters and cut off the rest of the nail that punctures through.
Attach a sawtooth hanger and that is it!


I went ahead though, and added some pieces of grapevine to the fronts.
It just makes it a bit more prim.


Then I painted up some stars to add a dash of color to them also.
I attached these to the fronts with craft wire.


I threaded it through the tiny gaps in between the tobacco sticks.


Here is another set that I did in a reddish color.


I tied on a bit of homespun fabric to these just to make them a bit different.


On another set that I forgot to mention. I ended up dry brushing on some black paint to the tobacco sticks.


It looked a lot cuter in person though.

Here they are up on the wall in my Booth:

Super easy and cute prim decorating props here!
 Hope ya'll liked them!

These are for sale in my Booth#555
$15.99 a set

Happy Crafting ya'll,
~Lisa

May 8, 2014

ROLLING PIN IDEAS


A few weeks ago, I had an idea after watching an "Everybody Loves Raymond," episode. If you haven't seen the show, over at Raymonds Moms' house, she has a rolling pin on the wall that holds mail.

So I went and bought a handful of rolling pins at the Dollar Mart for only $1.19 each, the wooden ones. And I tried my hand at making them. Well, turns out I'm not great at cutting the back off of the round rolling pins to make them flat against the wall. And the cuts to hold the mail.....well, they turned out awful. Take a look:


See how the lines came out all uneven? I had used a table saw for that and apparently it wasn't the right tool. lol.

And anyhow, I then came up with an idea to use some country homespun fabric and cover up my mess. That way I could try to salvage the wooden rolling pins. And here's what I decided on doing:

As you see in the photo above, I cut a piece of fabric to fit over the pin itself. Then I used a hot glue gun to glue it around the pin. I only glued the back of it. And it has held fine like that.


I also painted the handles in a flat back with some craft paint from Michaels. It just gave them a little bit more prim look.


And I took some craft wire and attached a metal star just to prim it up a bit more.

Lastly, I attached a sawtooth hanger on the back, which is the flat side, to make for easy hanging. I nailed in the small tacks that came with the kit. The kit was found at the Dollar Mart also, for only $1.19.


And that was pretty much it. After taking the pics, I decided to take some sand paper and rough up the handles a bit more. And they did look better after that. And that's all there was too it.

It was a craft fail that actually turned out salvageable. lol.


Happy Crafting Ya'll,
~Lisa

Nov 17, 2011

PRIMITIVE TOBACCO STICK TREE

My First Tobacco Tree try
The top photo is my first try at a tobacco stick tree and the bottom photo is my second attempt.
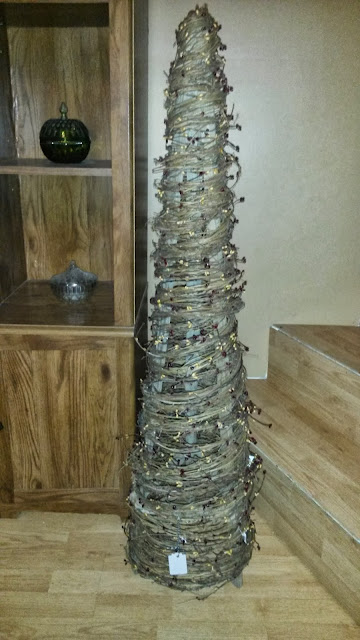
My Skinny Tobacco Stick Tree
My Second attempt at making a tobacco tree.

Finding a use for old tobacco sticks is pretty challenging. Yet I love the look of them indoors.
They add a perfect country touch in a primitive style. And they are a great piece to add a stash of light to a dark corner. So I don't mind the challenge.


To make these the first time, (the top pic, wide style,) I drew out a sketch.  
A basic triangular shape with braces.
I tried to keep the 4 legs of the tobacco stick tree all original sizes and not to cut them.

And after about 20 minutes of sawing a bit in the garage and nail gun, this is my first attempt.


I grabbed a 15' piece of grapevine garland.  It looks like this.

And it's already got the twirly affect when you unwind it a bit.
 I just start to run it up and around the Tobacco stick tree like this.

And then continue until you get to the top.
 I am thinking about going back and adding a few more strings of the grapevine garland to fill it in more.

But, don't worry if you don't have any grapevine garland because it is also super cute with with homemade rag ropes , a bit of pip-berry garland and lights of the season.

And I also like them with a small strand of lights.


I call it my tobacco stick tree.

Since making this very first one, I've made many more with a few different options now. I prefer the skinnier ones that are wrapped in grapevine. To see them, click here.
My Skinny Tobacco Stick Tree
This is my second try at making a tobacco stick tree. I prefer it like this. The slim version.

I also figured out these make great uses in the garden also. Like this pic below where I have a cucumber plant underneath and allowing it to grow up a tobacco stick tree.


And anyways, 
I even made one of these tobacco stick trees to go over my tomato plant also.


That's a cute mini tobacco stick chair holding the flower pot of peppers beside it and here's a larger version I made also:
Click for TOBACCO STICK CHAIR

I made these to sell in my Peddlers Mall Booth #555, and have recently been making other items such as:

You may also like these Primitive Crafts:

Primitive Tobacco Stick Grapevine Tree

Tobacco Stick Chair


Americana Tobacco Stick Flag


Primitive Barnwood Tool Box