Pages - Menu

Showing posts with label tobacco sticks. Show all posts

Apr 25, 2015

Tobacco Stick Bench & Fence


Tobacco Stick Bench
Thought I'd show you another use for those old tobacco sticks you may have laying around.

Here is some of mine. I keep theme upright in an old trashcan, out of the rain:

I made the tobacco stick bench for a country, rustic themed wedding.
It was to be one of a few, sitting by a tobacco stick table (photos coming soon) to work as the gift giving center.


It is just a basic bench design, very simple. Notice the red lines. It's a basic bench design:

I used the tobacco sticks at full size, other than a few that were cut as the braces.  
See the shorter pieces as side braces
 And the bottoms of the legs.  They had to be cut to get the point off, so that they would sit flat on the floor.
I used a nail gun to shoot the nails in since the tobacco sticks are a very hard wood.

Ignore the egg and beater below, and you can see the nails sink in pretty far and aren't noticeable at all.
 On the back of them though, you have to take wire cutters and cut off the rest of the nail that shot through. Unless you have shorter nails to use. I didn't.

As you can see, after the basic frame, I just went back in and spaced the "seat & back" area by just eyeing it to what looked good to me.

The front bottom rail on this one has to be replaced. Because as soon as I finished it, my nephew ran up and of course, put his foot on it to start to climb.

Tobacco Stick Fence:
While I had the tobacco sticks out, I made a make do yard fence also. I love these for decorating around the holidays. And they are so easy to just take and stick anywhere.
Very simple. In this photo I just laid the last row on the top of the frame. But when nailing it, I kept all three runs on the same side.

And since the legs are already pointy, they are easy to stick in the ground where you want to decorate!

Here it is propped up to get a view:

Hope ya'll liked this.
See ya next time!
~Lisa
And if you like tobacco stick crafts I have a few more here in this blog:

~*~
Since many people ask me what tobacco sticks are, I thought I'd add this.

Sorry, I grew up in KY and just thought everyone knew of them.


These old tobacco sticks were used in the fields when growing tobacco, and were speared through the tops of the stalks of the tobacco. 

They were essential for "hanging" the tobacco in the barns to cure. 

A lot of stalks of tobacco could be slid onto one tobacco stick. And then they were then hung up on the rafters in the barn to cure on the railings.
Here is a bunch of tobacco:
 

Let me leave you now as I sit down to a waiting bowl of my good ole'
Fried Cabbage!
YUM!

Happy Crafting Ya'll!
-Lisa

Apr 3, 2015

Primitive TOBACCO STICK FENCES


I have been making these cute little fences out of tobacco sticks for a few years now.


I'm gonna show you the basics of how to put one together.

Here is one all plain, just the tobacco sticks:

Simple as it looks.
Just lay out some tobacco sticks, cut them in the lenghts you want and then nail them together.
I use a nail gun so that it goes by faster. And these tobacco sticks are a hard wood.

And then you just start to decorate them however you want.
Here are a few that I have recently made and sold in my 
Booth#555 at the Peddlers Mall.

 Look close, I used a Blue Willow tea cup as a birds nest and put a red speckled egg in it that I made here.
CLICK HERE TO SEE HOW

I wired it on with craft wire through the handle.

 As you see, I just lay them out and make a variety of types and sizes.
You really can't go wrong with this craft!

Here's a photo of a few of them in my 
Booth#555 at the Peddlers Mall.

These tobacco stick fences are $9.99 each in
my  Booth#555

Thanks to ya'll who've been buying them!!

Happy Crafting Ya'll!

Apr 1, 2015

TOBACCO STICK SHUDDERS


Here are the tobacco stick shudders up close.


Primitive Tobacco Stick Shudders

These are shudders that I made out of tobacco sticks.
Don't know what tobacco sticks are? Click here.

Since I have so many of them handy and they make for awesome primitive crafts, I've been trying to use them in all sorts of ways.

And these cute primitive shudders turned out pretty cute.
All you need to do is basically lay them out in a line, kinda find the straightest ones then cut to same size. It only takes about 5 wide.
Next, just take a piece of the cut off sections and lay them sideways on the front to kind of brace them all together. 
I had my husband take a nail gun and sink the nails way in so that they aren't seen much from the front.
On the back though, you will have to take wire cutters and cut off the rest of the nail that punctures through.
Attach a sawtooth hanger and that is it!


I went ahead though, and added some pieces of grapevine to the fronts.
It just makes it a bit more prim.


Then I painted up some stars to add a dash of color to them also.
I attached these to the fronts with craft wire.


I threaded it through the tiny gaps in between the tobacco sticks.


Here is another set that I did in a reddish color.


I tied on a bit of homespun fabric to these just to make them a bit different.


On another set that I forgot to mention. I ended up dry brushing on some black paint to the tobacco sticks.


It looked a lot cuter in person though.

Here they are up on the wall in my Booth:

Super easy and cute prim decorating props here!
 Hope ya'll liked them!

These are for sale in my Booth#555
$15.99 a set

Happy Crafting ya'll,
~Lisa

Oct 21, 2013

Primitive Tobacco Stick Grapevine Tree


I recently posted about how to make a Tobacco Stick Tree out of old tobacco sticks. Well, today I'm going to share with you the process of how I take this a step further by adding grapevine. And turning those old, unwanted tobacco sticks into a cute Tobacco Stick Grapevine Tree.
A row of old tobacco sticks after I had washed them. I try to pick close sizes when working with them.

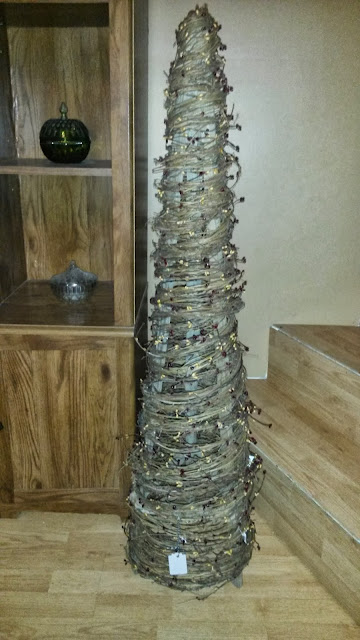
Since making this very first tobacco stick grapevine tree, like this, I've made many more with a few different options now. I prefer the skinnier ones like this:


And here it is when I was just toying with some grapevine on it:

And I started to like it. So I added a few more strands to fill it in. And it started to look like this:
Then I had to add even more grapevine to hid the legs, which I was planning on leaving showing, but it looked weird. And I also started to tie in some sprigs of pip berry garland to add more interest, like this:

 The grapevine garland comes in rolls and looks like this when unrolled:

I didn't want to overload it with the grapevine garland so much that it would hide the tobacco sticks. I think they look kinda cute showing through. Here it is all done with everything except the lights.


And my latest one is now a tabletop version for those spots where we just don't have enough room for the full size. Here is the beginning of my very first ever, tabletop tobacco stick tree without any decorations so you can see the basic frame:

And here is the same one, tabletop version with a bit of grapevine garland just strung on. So you start to get the picture:
I'm still working on this one, :-) 
here's an update pic now:

But here's a few below that I have recently finished and sold:

This one with yellow pip berries was a trial and error. I took sprigs of pip berries and put them on one by one instead of stringing the strands of garland.


I didn't want to hide all the tobacco sticks. 


And here's another shorter, tabletop kind with grapevine, star lights and pip berries:

Small, skinny and plain. Love this one.


I made these to sell in my Peddlers Mall Booth #555,

Here's some other things I've been making too, if you are interested.


Primitive Crafts:

Tobacco Stick Chair


Americana Tobacco Stick Flag


Primitive Barnwood Tool Box


Happy Crafting Ya'll! 
-Lisa