Pages - Menu

Showing posts with label Mason Jar Crafts. Show all posts

Dec 24, 2019

Mason Jar Earrings and Dollhouse Mini Mason Jars

Mason Jar Earrings 

and

Mini Wooden Dollhouse Mason Jars


Hey ya’ll!
I usually don’t do these type of posts, but here are some miniature, dollhouse mason jars I’ve recently been tinkering with.
I have also made them into cute Mini Mason Jar Earrings too in my Etsy shop!

When I ran across a listing on ebay for these plain, unfinished, adorable little wooden mason jars, 
I knew I wanted them.  
I just didn’t know what for at that moment.

Well, today, about a year later, I got them out and thought it’d be cute to make some tiny little dollhouse type food for the cupboards. 
And then also made a few Mini Mason Jar earrings too.

I know that dollhouse miniatures are a very popular thing, I just haven’t really ever gotten into them.  
But give me tiny mason jars and I’m there!

So here was my idea.
I just went into Word and Paint on my pc and tinkered around and made some tiny little word labels.


I couldn’t get them to print out small enough, so I eventually had to copy them on my printer/scanner/fax and then resize them.  
I think I tried a 75% first and then eventually had to go down to a 49% to get a good fit.

 I gathered up some supplies:
-Mod Podge
-Scissors
-A Paintbrush


And then I just cut each one out. They were tiny! And I use some Mod Podge to glue them on and an extra coat to seal the outside.

 
And then just let them sit and dry. And wa~la!
Here they are.
 
If you look pretty dang close, you can see I tried to make some green beans, carrots and tomatoes in the right hand corner.  

To kind of give them a different look to make a set of 4. 
The fourth one, I just left plain to say Ball.
I am not sure my usual, craft peeps will be interested in these, but hey, maybe take this label idea and use it on larger items?

I  listed these in my Etsy as earrings.  
And here is a few pics of that:
 Now available in my Etsy shop


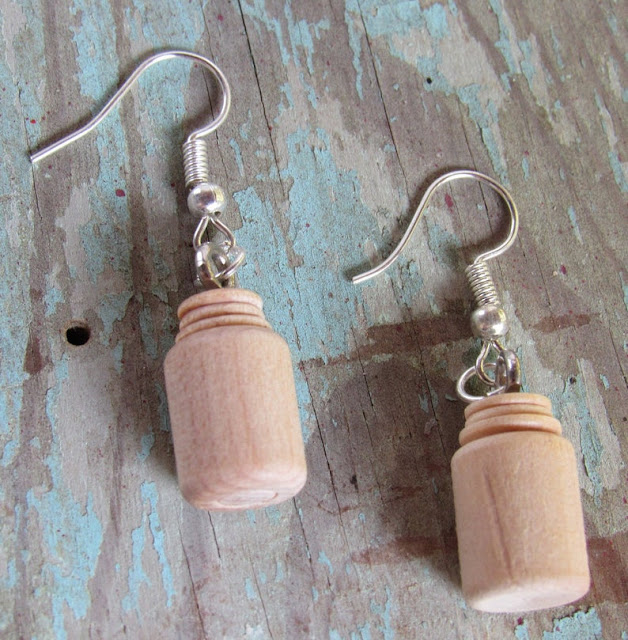
Happy Crafting ya’ll!
See ya next time,
~Lisa

Sep 4, 2016

MASON JAR STAMPED GIFT BAGS


Time to spruce up those plain ole' gift bags you got on clearance last year.  Here's what I recently done to a bunch. I made them into Mason Jar Stamped Gift Bags.  Mason jar anything really catches my eye and I hope they do the shoppers at my local co-op also.

Here's how the Kraft bags originally came in both green and red. The price says $3.00 but I got them at the Christmas clearance at Big Lots for 75% off.  Woot woot!

I got them for 75% off at the Christmas Clearance sale.
As you see above, I just got out my big and little Mason Jar stamps and black ink and started stamping.


I didn't have an exact idea in mind, just to stamp.
Some of them, as you see in the back, I stamped on the words, "Thank You," in case someone is using the bag as a thanks gift.

Really simple way to spruce up those plain bags I think.  And anytime I can use my Mason Jar stamps, I'm ready!


The green ones are larger, but you can't really tell from this pic. I did get two different sizes.

And to finish them off, I took some jute string and a Manila tag and tied one on each.
Ready for someone to write on.


I'm gonna tuck these in at basket at my local co-op craft booth, beside my Mason Jar crafts.
I'm thinking maybe pricing these for .99cents each? Not sure yet, but I'll give it a try and see how it goes.

Happy Crafting,
Happy Crafting Ya'll

Feb 1, 2016

DIY Stamped Gift Tags


I have been on a kick recently about making stamped gift tags.  
I have all sorts of stamps I have collected over the years and they are now being put to use. 
And if you don't have the right stamp for the right occasion, 
they are super easy and cheap over on ebay.

Here's what you need:
-Plain Manilla Tags or Make Your Own 
out of stock paper and a tag punch (which I do a lot!)
I got my punch on ebay.
-Stamp of choice
 
-String 
( I love bakers twine and it comes in all sorts of various colors)


Then simply just get to stamping up your favorite designs! 


String it and you are done!


So super easy and the designs are only limited to your imagination really!

Here's some of my recent sets.  I tend to make them in sets of 25. 
That amount fits great in my little baggies.


Oh yea, some of them I like to "Grungy" up. 
I think it makes them a bit more primitive looking.
But you must do this before stamping, or so I've learned so that the stamped
design doesn't run.


To do so, I just mix a bit of brown craft paint into a small amount of water.
I then dip the tags down into the mix, 
lay them on a baking sheet and back for about 10 minutes in a 400* oven.

Take out, set aside and cool. And then I go back and brush on a bit of Vanilla Extract.
It takes a bit of time, but it is o'so worth it!

Here's a close up of some of my "grungy" tags:


Whether you choose to make your tags grungy or not, I'm sure they will be super cute.


These are awesome to tie onto gifts or to just decorate your primitives with.
I also even just add them as a "Made by" tag for some of my handmade crafts now and then.

Till next time,
Happy Crafting Ya'll,
~Lisa

Sep 12, 2015

MASON JAR LID WREATH DIY Craft Tutorial

MASON JAR LID WREATH

Want a cute way to use up all of those extra Mason Jar lid rings you got laying around? I recently saw a  few posts on Pinterest about these and I couldn't wait to give it a try.
I have quite a few...
  And this is how I did it.

Super easy.  Seriously.  Just take some sort of heavy wire,  or in my case, I used a wire clothes hanger.  I used wire cutters and clipped one end open so I can string the rings on them.
 
Then I just bent it to the shape I needed and started sliding them on.
 
 
The number of lids basically depend on how big you want your wreath to be.  Oh, and these ones I was using are Regular mouth, standard lids. So just play with it.  But I'd recommend at least having 30 to 50 rings on hand. More for a larger one or so on. 
 
You could also experiment with "fillers" in between each ring to save on using so many. But for my first one here, I'm just gonna keep it as simple as I can.

And seriously, that is it.  After you have strung enough, just twist up your wire together and if you can, leave the hook for easy hanging. Otherwise you can tie on some sort of fabric hanger if you have to.

You probably will have to go back, once it is hanging and straighten out the rings. They tend to move and shift while working with the wire a lot.
See how they shift. But it's easy to straighten them up. And after it's done, they stay even with the door opening and closing.

Super easy and cheap craft that definitely screams country any where you place it.


I'm already thinking of making another one.
But for it, I am thinking of experimenting with those foam floater sticks for swimming. I bet they would hold good, as long as they will fit inside the rings. And I bet with those, I'll definitely have to use some sort of filler to hide the foam rings. 

See ya'll next time,
~Lisa

Sep 10, 2015

MASON JAR RING PUMPKINS with FREE LINKUP

MASON JAR RING PUMPKINS
Hey ya'll!
Time for some more Fall crafts to get us geared to the cooler months a comin'!
Here's some cute pumpkins I recently made out of some old, leftover Mason Jar Rings.


It's a pretty easy craft and all you really need is:
-Mason Jar Rings (save the lids too!)
-Twine
-An acorn
-Glue (I use E-6000 found at Walmart)
-Cinnamon colored paint (optional)

Okay, lets get out our Mason jar rings. 
Here's my big ole wooden slat, bushel basket full of the ones I save:

If you don't have any on hand, just grab a few boxes at any Dollar General or Walmart. They have tons in store now because it's canning season. And they are only about $2.00 a box or so of 24.

Now grab you a roll of some type of twine or wire if you have any. I use this basic jute, twisted twine for about all of my crafts anymore. It is like $2.00 a roll at the Dollar General.


Alrighty, now on to the stringing of the lids.
Just basically just take a bunch of lids, facing the same way, and string them onto your twine.  Don't cut your twine yet until you know how big you want to make your pumpkin.  

For one of my pumpkins I used the Large mouth rings and for the other smaller one, I used the regular size rings.
Here's my sister holding it up for a pic.
It will probably take more than you are thinking of in your mind. Mine did. But the fuller it is, the better it looks.

After you get a bunch strung on it and rounded up how you like, just kinda tie the twine together to give it a strong hold.


Be sure to leave enough twine hanging out, before you cut it, to make as a cute looking vines!

And then just take you a pine cone and glue it in place right in the center top. 
 Make like a good stem.
You can buy a bag of pine cones and plastic pumpkins at the Dollar Mart right now for a $1.00. A cute variety bag!

And then just go and sort of dry brush you on some streaks of cinnamon colored craft paint to about every other ring.  Not too much color, just enough to give it a bit of something.  Kind of rub the brush off on some paper before using it.  Because you really don't want too thick of a coat. Just kind of streak it on.
After this pic, I took my finger and rubbed off some of the orange to give it a more worn look.
And that is about all there is to this cute Mason Jar Ring Pumpkin craft!

Here's a few more pics of them:


Hope ya'll liked this cute little Mason Jar Ring Pumpkin idea. I wish I could take the credit for it, but I can't. I first saw it on Pinterest.  But whoever did come up with it first was a genius!

Have a craft related post you'd like to share in my linkup below? Share away! & See ya'll next time,
~Lisa