Pages - Menu

Showing posts with label grapevine. Show all posts

Sep 10, 2014

WEDDING ENTRY DOORS


My niece was getting married last week and she had requested for me to make the entry doors, in a country theme, that she comes through as they play "Here Comes the Bride."

I was honored of course.  And being a crafty person by nature I set off to make them a one of a kind, just like her!

And here's what I started with:


She found these at the Peddlers Mall for only $35.00 each. Nothing great, but they had lots of potential. Especially by being white, they saved me tons of time!

I started by just thinking about what is all around you in a country themed wedding.  Grapevine! Yes. 


So I used a 15' roll of twiggy grapevine I have from selling it all the time in my Booth#555 (find it here on eBay for only $12.89 for 2 rolls.)

I used a staple gun to attach it to where I wanted it. The bendy shape of the grapevine helps it roll so curvy down the sides super easy. Giving me a great shape!

It was already starting to take shape just with the grapevine.

Then I took some broken pieces of the grapevine and tied them in the upper corners of each, making it like a makeshift mess. lol. But I had a reason for this.  It was going to be the frilly stuff behind the flowers. Just to give it more depth.


Then I needed to incorporate some burlap. Her wedding fabrics were burlap and lace.  So I grabbed what little pieces I had leftover from crafts and made some makeshift burlap bows:


The burlap bows were nothing fancy, just sections of burlap with a wire in the middle to make it appear to be a bow. Easy!

Then I moved on to adding some details flowers. I choose fake flowers that looked like babys breath since it was a country wedding. And I found some paper wedding bells for a little over a dollar each pack at the Dollar Mart! And the small pack has 7 bells in it!


I took the flower bunches and stuck them up in each corner of the door, behind the burlap bow. And then tied on the small paper wedding bell from the center.


Oh yea, It was really starting to come together!

Next, I added on the large paper wedding bell. And this is what really made it start to look like a focal point.


So cute and country!

I had made some letters of their last name out of tobacco sticks and grapevine. 


But after holding them up to the doors, I didn't like how it looked. So I left them out. Maybe they can use them in the wedding some where's else, I thought. The letters were cute though, with the little white paper bells hanging from the center of each.


And just to make sure, I looked again. And I still didn't like the letters on them at all.


So I forgot about the letters and went back to how they were without them:


And that is how I was going to leave them.  She didn't need handles, but I started to add deer antler handles to each one, since her hubby to be was a huge hunter!


For you savy savers following my blog, here's the total cost of making the doors:
Total cost of the doors: (Bride & Groom bought these)  $35.00 + $35.00 = $70.00
Total cost of the bells :  3 packs at $1.39 each = $4.17
Total cost of the flowers: 2 fake bunches at $1.19 each = $2.38
Total cost of grapevine: (I had my own, but if you have to buy a roll) $6.45
------------------------------
$83.00


Isn't that an awesome set of French Country Wedding Doors for only $83.00?
See ya'll next time,
~Lisa

Oct 21, 2013

Primitive Tobacco Stick Grapevine Tree


I recently posted about how to make a Tobacco Stick Tree out of old tobacco sticks. Well, today I'm going to share with you the process of how I take this a step further by adding grapevine. And turning those old, unwanted tobacco sticks into a cute Tobacco Stick Grapevine Tree.
A row of old tobacco sticks after I had washed them. I try to pick close sizes when working with them.

Since making this very first tobacco stick grapevine tree, like this, I've made many more with a few different options now. I prefer the skinnier ones like this:


And here it is when I was just toying with some grapevine on it:

And I started to like it. So I added a few more strands to fill it in. And it started to look like this:
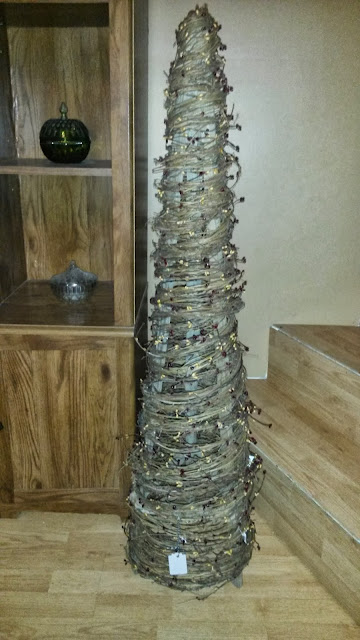
Then I had to add even more grapevine to hid the legs, which I was planning on leaving showing, but it looked weird. And I also started to tie in some sprigs of pip berry garland to add more interest, like this:

 The grapevine garland comes in rolls and looks like this when unrolled:

I didn't want to overload it with the grapevine garland so much that it would hide the tobacco sticks. I think they look kinda cute showing through. Here it is all done with everything except the lights.


And my latest one is now a tabletop version for those spots where we just don't have enough room for the full size. Here is the beginning of my very first ever, tabletop tobacco stick tree without any decorations so you can see the basic frame:

And here is the same one, tabletop version with a bit of grapevine garland just strung on. So you start to get the picture:
I'm still working on this one, :-) 
here's an update pic now:

But here's a few below that I have recently finished and sold:

This one with yellow pip berries was a trial and error. I took sprigs of pip berries and put them on one by one instead of stringing the strands of garland.


I didn't want to hide all the tobacco sticks. 


And here's another shorter, tabletop kind with grapevine, star lights and pip berries:

Small, skinny and plain. Love this one.


I made these to sell in my Peddlers Mall Booth #555,

Here's some other things I've been making too, if you are interested.


Primitive Crafts:

Tobacco Stick Chair


Americana Tobacco Stick Flag


Primitive Barnwood Tool Box


Happy Crafting Ya'll! 
-Lisa 


May 11, 2013

Tobacco Stick Ladder Smaller Size


Today I made a smaller version of my original Tobacco Stick Ladder, which was full size.

I figured not all of us have room for the larger version. And the smaller tobacco stick ladder can be tucked or stashed in many different places than the larger one. Even sat on top of a cabinet to add additional height to a room.

I added some grapevine, along with homespun and a metal hanging star for detail.

For construction of the ladder itself, I used a nail gun because the tobacco sticks are so hard of wood, that you need the force. Otherwise, sitting and tapping with a hammer and small nail really gets you nowhere.

Here's a pic before I finished off the details. You can see the basic structure.


and here's another pic finished:


You may also like these Primitive Crafts:


Primitive Tobacco Stick Grapevine Tree

Tobacco Stick Chair


Americana Tobacco Stick Flag


Primitive Barnwood Tool Box

Mar 12, 2013

Distressed Wood Sign


I'm posting about making my Booth #555 sign because it can apply to any worded sign you may want to do. Just find or buy you a preferably blank piece of wood. And you can print out any saying you'd like (fresh eggs, welcome, ect.) simply by using:
Microsoft Word
an ink pen
sharpie marker
acrylic craft paint


I wanted to make a new booth sign so passer bys could easily remember my booth number. Most booths at the Peddlers Mall only have tiny printed out numbers taped on the outside wall of their booth. I have always wanted a way to stand out. So here's how I made it.

I started out with an old broken wooden wine rack, (I'm guessing) that I won from an auction.

First off, I printed out a few different size "5's using Microsoft Word. 

Then I unscrewed the two screws holding on the broken wine hangers and removed them.
I ended up using the one that was almost center of a regular printer size paper. It was perfect for my size board.

Then I eyeballed it and centered the middle one as best as I could, leaving room for the other two. And I used a ball point pen and traced the 5 onto the board. Pushing enough so that there would be an imprint left behind for me to paint along.


And after tracing, here's what I was left with. A good enough impression to keep me painting straight. Look close and you can see it.


Next step was to paint all the 5's in with an off white, acrylic craft paint.


one by one........


Ah, it was finally starting to come together now. Then I decided to take a shortcut and use a black sharpie marker to outline all the 5's. I just figured it would be way faster than painting those thin little lines and it was. I was worried about feathering from the marker on the wood, but thankfully it didn't happen. Be careful with yours!


I did the same lines on each one, to try and keep it consistent. Then I came back and forth until complete. Be careful that your hand doesn't smear the marker before completely dry!


I then let it all dry for about 20 minutes. I didn't want to take a risk because my next step involved sand paper. lol. I took some medium grit and roughed it all up a bit. Kinda giving it a worn look, but not over doing it by rubbing off an entire 5 or anything.

Then I got out my all purpose sealer and put on a light coat. I did this 2 times so that my sign can withstand being dropped, scraped, thrown in the back of my truck and so forth. lol I'm kinda rough on items unless they are really fragile!


After that dried, I thought it could still use a bit of something. So I got out some pieces of grapevine garland and stapled some on the edges. I also hung a little metal brown star in the middle,  look close, and I wrote "crafts by Lisa." And then I was finally done and happy with it. Here it is all finished.


I hope this gives you the gumption to start making a wood sign. Ideas could include, Fresh Eggs, Welcome, Primitive, Laundry, Cottage....the list goes on and on. Keep in mind that it was super easy with the pre-printed out 5's! And it's now sitting on a shelf right in the center of my Booth #555 at the Peddlers Mall in Morehead, KY.

Happy Crafting ya'll!
~Lisa