Hey ya'll!
Here's a post about how to turn just about any plain hanging ornaments into some cute, wintery, snowman ornaments.
I had ordered a ton of these wooden, hanging hearts at an after Valentine's Sale online. And I got them super cheap. I mean like under a dollar a dozen. They were burgundy with various sayings and already had the wire hanger too! So I couldn't go wrong.
 |
| BEFORE PHOTO |
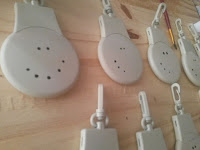
First off, I spray painted them a random color I had on hand. It was a sage'ish green in the Rust-oleum brand in a satin finish.

I so wish I had the Almond color on hand, but I didn't. So I just went with it.


Next, after those drying, I took some cheap white and cheap black and did the speckle effect.
Just barely hold down the spray button and let it fling out on them.

I had so many, I had to lay them all over the place to dry.


Finally after drying for a few hours, they were ready to begin painting!
Most of them I painted in the Snowman themes and wrote various sayings like "Frosty" and such on them.


And some said "Burr,"

"Winter Wishes,"
and "Best Flakes."


Then I decided to make a few Candy Cane ones.

And added some wording of "Home Sweet Home."

There's a ton of these not in the photos, but I finally got tired of the winter theme and started doing some primitive designs.

This one below I mixed it up and glued a bit of pinstripe fabric on it, and then glued a rusty star on the center. Then just worded on "Love."

The "Faith is Believing in God" is one of my favorite sayings.

Then I used a small checkerboard stencil and stenciled on a background for the one below.
And I put on the saying, "Old Crow Co."

Oh, and as you see, I went through my fabric stash and grabbed bits and pieces of various colors and tied them onto the wire hanger.

I made so many of these and I did save a box of them to do in a different base color. Almond I'm hoping soon! But for now, I just used colors I had on hand so that I didn't have to put more money into making money.
I'm going to price these for $3.19 each and considering I paid just under a $1.00 / dozen (about 7 cents each,) that will be a good profit.
And these type of cheap, hand painted ornaments tend to fly off the display trees during Christmas time. They are a great, unique gift that not everyone will have one of!
Hope this gave ya'll an idea to paint up some holiday hanging ornaments.You can do these on just about any flat, hanging ornaments you may have already or can find at the Dollar Marts.
See ya'll next time,
~Lisa