Pages - Menu

Showing posts with label snowmen spoons. Show all posts

Sep 6, 2016

HALLOWEEN MASON JARS with Wooden Pumpkin Spoons


Hey ya'll!
Here's a Halloween themed idea for those plain ole' Mason jars you may have.  And if you don't have any on hand, Walmart and even the Dollar General stores carry them in cases.
Plain jar before
The Halloween themed Mason jar looks like it has a lot going on. Really it was pretty simple.

Okay, so first off we need to clean the outside of the jar with a little bit of alcohol.  This will remove all dust, lint and crap so it will have a good, sharp finish.
I just wiped it down with a paper towel dipped in the alcohol.

Okay then just paint the inside of the jar a color you want to pop. I choose the Cinnamon color from Folk Art craft paints.  

Oops, this is a pic of another one I painted Cinnamon on the outside. But anyways, just paint the orange on the inside if you are going for the look of my top pic, or vice versa if for another. 

And for the outside I went with antique white.

Okay, I've switched up the pics somehow of the inside and outside, but this pic shows the white inside. But remember you want the white on the outside if you want it like the jar at the top of this page.
For some reason I've vice-versa'd the pics.

Okay, anyways, after you have painted a good coat on the outside in white, and its dry, take some fine grit sandpaper and sand it. 

And you'll start seeing this.

I like all the scratchy type marks.
And wipe all the dust off then add one coat of sealer. I like the varnish in satin.


And let it dry then decorate it with burlap strips, a bell

                        
      and some of my pre-made  


And here it is finished:


And here's the other one I just finished up.


See ya'll next time,
~Lisa


You may also like:

More Mason Jars in the Halloween Theme

 LINK TO HALLOWEEN WOODEN SPOONS

Aug 26, 2014

Primitive Wooden Spoon Magnets

I recently posted about how to make primitive, wooden spoons here: PRIMITIVE WOODEN SPOONS with step by step detail. It was a great project! And got lots of interest from many of you.

I have since revisited this idea and turned the crafting up just a notch by making them more interesting.

Here's how I did it:

I started off with plain, simple wood spoons found at Walmart in packs of 4 for around a dollar in the kitchen supply section.

I use a few of the same photos from previous posts when it is plain wood spoons so I don't have to take them for each craft post. lol. Just in case you are tired of seeing this same pic I use in my spoon posts.

Very cheap!

I bout about 10 packs of these. And then I paint them in a variety of colors. Here's a group of mine being painted in ivory white. I used spray paint this time because it was faster.


Just mix and match sizes and paint them in groups. Let dry for a few hours. Don't forget to paint the backs!

Sometimes though, for certain colors, you will need to hand paint on some craft paint for the base coats. This takes more time, but you have many great colors to choose from. I tend to stick to basic black, navy blue, wine red, okra yellow and sage green as base colors.


And then after you have a ton of all these colors ready, you're set for the next step.

You will need to paint over them with a second coat in another totally different color. Yes, I know sounds like a lot of work, but trust me, IT IS WORTH IT. It makes them look so much better.

And after that second coat, you will be ready to start some light to medium sanding. I use a light sand paper, nothing real heavy.
LOOK CLOSE at the REDish color one in the middle. Do you see how the black is the second coat? See when I took sandpaper and brushed off some of the second coat, it allowed the red underneath to show. And it makes it look older. I love it!

When I ran out of black spray paint, I brushed on some of that in the can too. I was worried it wouldn't sand off easy, but it did.


And after the sanding, I was ready to start hand painting some detail. I just looked around in magazines and online clipart for ideas in the primitive them and free handed them below.
Some I did a willow tree on, and old crow that I tried to paint, sitting on a crock. A simple bowl with a star and a window scene with shutters. And oh, a cute plate sitting on a shelf with a star in it. These took some time, about an hour to just do this part and lots of patience.

And then I was ready to add the magnet. I got the round ones from Walmart craft section cause they are stronger to hold notes and papers.

Just simply hot glue them on. The hold is super strong! And it dries fast!

And here's some that I have all finished and in my Peddlers Mall Booth #555:
I priced these for $2.49 each. I'm not sure if that is good or bad because I have none to compare them to. So far, I'm the only one that has made them in my area for sale. With such a strong magnet, I think it is worth it.

What do you think?


--------------------------------------------

Note: In case you don't want to do magnets on these: For the previous Primitive Style Wooden Spoons that I made and didn't turn into magnets, I grouped them in groups of 3 for sale, like this:


Jul 29, 2013

PRIMITIVE Style WOODEN SPOONS

PRIMITIVE WOODEN SPOONS

I am in love with making primitive themed wooden spoons!

 And this here is about my fourth batch of them so far. I'm addicted! lol. They have been really steady sellers at my Booth #555 at the Morehead Peddlers Mall

I've been bundling them in groups of 3 and pricing them for only $2.95. 
I do have more detailed ones that I've turned into magnets for sale as well, for $1.99 each.


I start out with the plain ole' wooden ones you find at WalMart for a pack of 4 for $ .88.


I lay them out on some chicken wire (best ever thing to spray paint on!) with the sides bent just enough to keep the spoons off the ground. Spray them a base color of whatever I have on hand. I like black, dark red and yellow as base colors.


Then after spraying both sides, I let them dry a few good hours. Then I bring them all in and do another color with craft paint. Whichever color you want. 

As you see from my finished pics, I make a wide variety of primitive colors. And the reason I spray paint a first, base coat, is so that when I do my finish sanding, the base color kind of seeps through and makes them appear a bit older. Kind of rugged looking or aged.


And another thing. To give it a sealed, finished look, I always like to take some Satin Varnish from the craft paint section and give each spoon a quick coat.


And here's some more I've just finished up today. 
These say various kitchen words like, coffee, sugar, flour ect.


And some black and off white ones with the theme of eggs, checkerboard and stars:

And some reddish brown colored ones that say Old Crow and have the star and checkerboard on them.


And some more various colored ones in cinnamon, yellow and colonial green:

Those old crow hang tags are some I also made by using a simple stencil purchased from eBay.

I hope I've given you a crafting bug for those plain old wooden spoons you probably have already laying around! I have to go get some more done, because I am restocking my shelves tomorrow at the Morehead Peddlers Mall. And also putting some in my eBay shop at


And if you'd like to see more, here's the link to my other Primitive "Kitchen" Themed Wooden Spoons

And here's my holiday themed wooden spoons in Snowmen
 

and Ghosts:

 
Happy Crafting Ya'll!
And see ya next time!
~Lisa

Aug 17, 2012

SNOWMAN & PUMPKIN WOODEN SPOONS (& Snowman Magnets)


I ran across this great idea over on a fellow bloggers site, Eyeballs by Day, Crafts by Night, and I just couldn't wait to give it a try. Here are mine:


These are going straight to my Peddlers Mall Booth, where I'm sure they will be a best seller!

Here's the before of the plain wooden spoons:
 
 They are a little over a dollar a pack at WalMart for a set of 4.

First, I spray painted half of them a white in the Rust-oleum brand spray paint, the other half an almond color, also from Rust-oleum brand from Walmart. Hint: Lay them on chicken wire if you have it for easy coverage!

Then I added on the faces, one by one, varying each a little bit. I placed stars down the center in place of "buttons" on the snowmen.

And then added some homespun scarfs.

On some I added a cute little jingle bell or other embellishment that I had laying around.

Some I painted "believe" and "faith" and such on a little wood bead that I attached with rusty wire. Just to add a bit of character.

In the last few pics below, I dabbed on a bit of rosey red to their cheeks also.
And here's the after pics:


NOTE
I also added some round magnets on the backs of a few so you can hang them on the refrigerator. 

It's great to hold notes in the winter theme! I grabbed a pack of 52 round ones with strong hold from WalMart for around $3.00. Just glue them on with E-6000 glue and let dry! Strong Hold!

If you are mainly an online shopper for craft supplies, I've gotten some great deals on Amazon too.

See ya'll next time,
~Lisa

Update: 
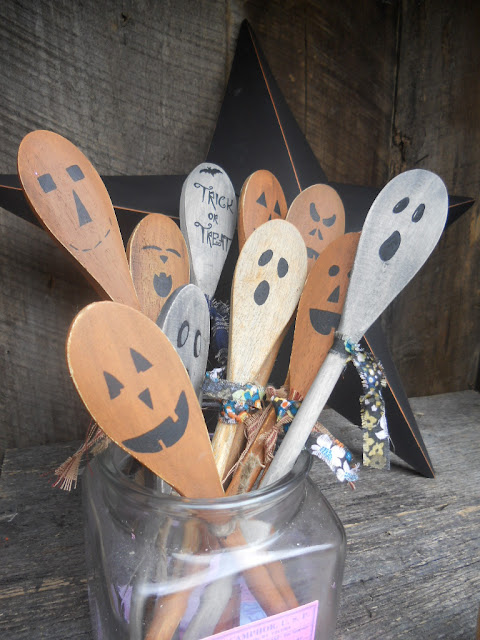
 Here's the newest Halloween themed spoons I have done so far.


Just kind of go wild with the faces and draw on things you would do to a real pumpkin.
Or like a few I did, write Trick or Treat on them with a pencil and then go back and either paint or use a black marker.
A few bats makes it cute as well.


 To spruce them up, I took some crafters wire and twirled it down their bodies.
And also tied a bit of twine at their necks.


These are for sale in my Booth #555 at the local o-op.
Cost: $1.99 each


*Here's a link to my most recent Kitchen themed wooden spoons*

Here's my latest use of these Pumpkin Wooden Spoons:

Halloween Mason Jar with Pumpkin Spoons

 HALLOWEEN THEMED MASON JARS with PUMPKIN SPOONS

See ya'll next time,
~Lisa