Pages - Menu

Showing posts with label holiday decorating. Show all posts

Sep 6, 2016

HALLOWEEN MASON JARS with Wooden Pumpkin Spoons


Hey ya'll!
Here's a Halloween themed idea for those plain ole' Mason jars you may have.  And if you don't have any on hand, Walmart and even the Dollar General stores carry them in cases.
Plain jar before
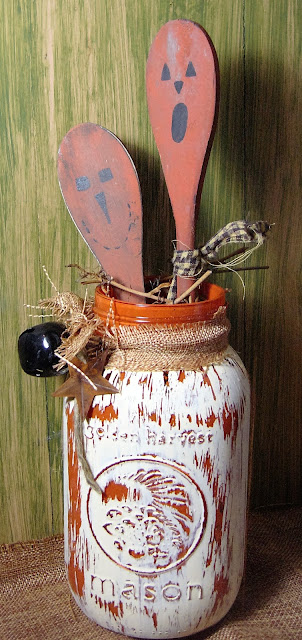
The Halloween themed Mason jar looks like it has a lot going on. Really it was pretty simple.

Okay, so first off we need to clean the outside of the jar with a little bit of alcohol.  This will remove all dust, lint and crap so it will have a good, sharp finish.
I just wiped it down with a paper towel dipped in the alcohol.

Okay then just paint the inside of the jar a color you want to pop. I choose the Cinnamon color from Folk Art craft paints.  

Oops, this is a pic of another one I painted Cinnamon on the outside. But anyways, just paint the orange on the inside if you are going for the look of my top pic, or vice versa if for another. 

And for the outside I went with antique white.

Okay, I've switched up the pics somehow of the inside and outside, but this pic shows the white inside. But remember you want the white on the outside if you want it like the jar at the top of this page.
For some reason I've vice-versa'd the pics.

Okay, anyways, after you have painted a good coat on the outside in white, and its dry, take some fine grit sandpaper and sand it. 

And you'll start seeing this.

I like all the scratchy type marks.
And wipe all the dust off then add one coat of sealer. I like the varnish in satin.


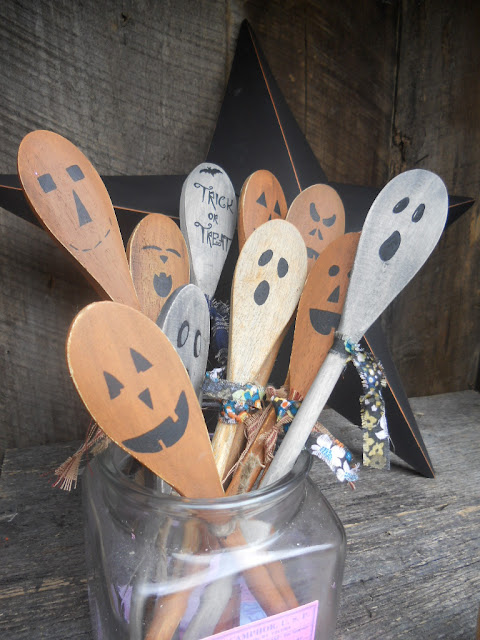
And let it dry then decorate it with burlap strips, a bell

                        
      and some of my pre-made  


And here it is finished:


And here's the other one I just finished up.


See ya'll next time,
~Lisa


You may also like:

More Mason Jars in the Halloween Theme

 LINK TO HALLOWEEN WOODEN SPOONS

Sep 4, 2012

Snowman Magnets


I recently ran across a blog called Eyeballs by Day, Crafts by Night and am in love with almost everything that this girl makes. It seems that we have alot of common interest in many crafts and I think she has some wonderful ideas. So over the weekend I tried out one of her ideas which was Snoman Magnets! And here's my go at it.

First, I painted some little wooden discs I found at Michaels craft store.


Then painted on the faces by looking at hers. Let that all dry, then came back with a home-made mixture of mod podge and with glitter and painted that on. It kinda give it that snowy effect without me having to purchase the glitter mod podge. And surprisingly, it worked. Lastly, I used some E-6000 glue (from Walmart) and attached some good strong, round magnets to the back.


And here they are all finished and ready in my craft booth:


Look real close and you can see the glittery snow affect.


I too, will also be selling these in my craft booth, so I went with the display method she used also. That is by sticking them on a metal star. I chose a red one I painted, and edged with a eggnog yellow.


I put sticky price tags on the back of each one.
I priced them for $  .99 cents each

I absolutely loved this craft!
Oh and I bought my round magnets at Walmart in the craft section.

See ya'll next time,
~Lisa

Aug 17, 2012

SNOWMAN & PUMPKIN WOODEN SPOONS (& Snowman Magnets)


I ran across this great idea over on a fellow bloggers site, Eyeballs by Day, Crafts by Night, and I just couldn't wait to give it a try. Here are mine:


These are going straight to my Peddlers Mall Booth, where I'm sure they will be a best seller!

Here's the before of the plain wooden spoons:
 
 They are a little over a dollar a pack at WalMart for a set of 4.

First, I spray painted half of them a white in the Rust-oleum brand spray paint, the other half an almond color, also from Rust-oleum brand from Walmart. Hint: Lay them on chicken wire if you have it for easy coverage!

Then I added on the faces, one by one, varying each a little bit. I placed stars down the center in place of "buttons" on the snowmen.

And then added some homespun scarfs.

On some I added a cute little jingle bell or other embellishment that I had laying around.

Some I painted "believe" and "faith" and such on a little wood bead that I attached with rusty wire. Just to add a bit of character.

In the last few pics below, I dabbed on a bit of rosey red to their cheeks also.
And here's the after pics:


NOTE
I also added some round magnets on the backs of a few so you can hang them on the refrigerator. 

It's great to hold notes in the winter theme! I grabbed a pack of 52 round ones with strong hold from WalMart for around $3.00. Just glue them on with E-6000 glue and let dry! Strong Hold!

If you are mainly an online shopper for craft supplies, I've gotten some great deals on Amazon too.

See ya'll next time,
~Lisa

Update: 
 Here's the newest Halloween themed spoons I have done so far.


Just kind of go wild with the faces and draw on things you would do to a real pumpkin.
Or like a few I did, write Trick or Treat on them with a pencil and then go back and either paint or use a black marker.
A few bats makes it cute as well.


 To spruce them up, I took some crafters wire and twirled it down their bodies.
And also tied a bit of twine at their necks.


These are for sale in my Booth #555 at the local o-op.
Cost: $1.99 each


*Here's a link to my most recent Kitchen themed wooden spoons*

Here's my latest use of these Pumpkin Wooden Spoons:

Halloween Mason Jar with Pumpkin Spoons

 HALLOWEEN THEMED MASON JARS with PUMPKIN SPOONS

See ya'll next time,
~Lisa