Pages - Menu

Showing posts with label ghost faces. Show all posts

Sep 5, 2012

Easy HALLOWEEN Candles


Want to make some cute, Halloween themed candles?
These would be very cute just sitting around to spruce the spooky feel!

All you need to start with is some plain white votives.  I got mine by the case at Big Lots.
I bought a pack of 24 votive sized candles at the local Big Lots for around $6.00.
This is what they looked like before.


These orange themed ones stemmed from my previous post, Ghost Candles


Once I got started making ghost faces on the white ones, I just had so many other ideas for them. Pumpkin faces, cat silhouettes, ghosts in a moon, the list goes on and on so I had to make more.


Then I painted some of them a base color of orange. 
I chose cinnamon color but it came out way more bright than I thought, which was okay. Left some white also, for the ghosts faces. 


Next I google'd "pumpkin faces" and choose images, so I'd have an idea of what some looked like to draw. Painted them on with basic black craft paint.

And then, here's where I got a little different with them. 
Instead of simply sealing them with a paint on sealer, I thought it'd be cool to set the faces in wax. 

Well, I keep a candle melted on my candle warmer at all times. I use it almost daily. It happens to be a yellowish-brown color, flavored butter-rum. (For the white ghosts at top, I used a plain white melted candle to dip them in.)

So I dipped each candle down in it, kinda quick, so that the paint wouldn't melt away from the hot wax. 
Then set them on a sheet of wax paper to dry. And that's it.

Oh, if you have noticed the grubby candle with the eyes, I simply grubbied it up a bit with some melted wax and cinnamon. Dipped that in the wax to set. Then continued on with painting the face and re-dipping him.


And then after they all dried, which they kinda quickly do, here is how I package them up.

I put them down in a small plastic bag and add a piece of cut brown paper. (Sometimes I cut up the brown wrapping paper or brown bags for this.)  And then use those printable re-turn address labels for a price tag.


And here is a little box crate of them all ready to go into my booth for sale.

Don't forget to check out my Ghost Candles for more pics!
And if you're interested, I made some Halloween Themed Wooden Spoons to display in Mason Jars also found here!
 Click here for Halloween Wooden Spoons

See ya'll next time!
~Lisa

Aug 29, 2012

Halloween Ghost Night Lights with Silicone Bulbs


I had fun making these Halloween Night Lights the other night, so thought I'd share them today.

If you aren't familiar with the Grubby bulb silicone recipe,   
within this blog.

But for the quick version, I took some clear silicone (the higher priced one, not the white caulk kind) and mixed in some cinnamon spice in a throw away bowl.


Just mix it until it's a nice smooth brown color. No real recipe here. Just play around with it. It should look something like this:

Then I took the little candles, one by one, and hand dipped each flame. I just stuck it in, twirled it once and pulled it straight out, in an upward motion. Kinda fast, so that it gives a nice tip to the flame.
After letting dry for a while, outside, hanging by a string they were ready to fix up.

I took some black craft paint and just dotted on the eyes and mouth. And painted the base.
On a few of the bases, I grubbied them up by first painting on Elmers glue and then sprinkling on cinnamon and letting it dry. It give it a good grubby texture. Then I painted over it all black.
And tied on a strip of homespun fabric and attached an orange button.

 Notice the light on the right has the grubby texture on the base and the
one on the left is just painted black.
 I think I like the grubbied up base more. What about you?


That was it!
They would be a great addition to the Halloween theme around your home. The soft glow when turned on adds a perfect spooky touch.

And remember, without adding the faces, these would make great, everyday primitive night lights also!

Price: only $3.59 each
in my Booth#555 and available in my CraftBooth555 on eBay

Here they are in a black candle box getting all ready for sale:
 Just ignore the mess around it, this is in my craft room.

I made a sign to stand up in the tray, after an idea from Maggie over at EyeballsbydayCraftsbynight.

 It just says a little bit about how I made them and that they are a handmade item and such.
I cut it out of a regular piece of computer paper and glued it to a wooden finial I had. It made a great base. And I can easily change it out.  I think the little signs grab a lot of attention.

And if you look close to the left in the tray, you can see some little snowman silicone bulbs I also gave a try:

I just added more cinnamon to the silicone bulb mix and painted on a snowman face.

Check out:
 GRUBBY SILICONE BULB RECIPE

Please be careful when working with anything that will come in contact with electric.


 Happy Crafting Ya'll!
See ya' next time!
~Lisa

Aug 17, 2012

SNOWMAN & PUMPKIN WOODEN SPOONS (& Snowman Magnets)


I ran across this great idea over on a fellow bloggers site, Eyeballs by Day, Crafts by Night, and I just couldn't wait to give it a try. Here are mine:


These are going straight to my Peddlers Mall Booth, where I'm sure they will be a best seller!

Here's the before of the plain wooden spoons:
 
 They are a little over a dollar a pack at WalMart for a set of 4.

First, I spray painted half of them a white in the Rust-oleum brand spray paint, the other half an almond color, also from Rust-oleum brand from Walmart. Hint: Lay them on chicken wire if you have it for easy coverage!

Then I added on the faces, one by one, varying each a little bit. I placed stars down the center in place of "buttons" on the snowmen.

And then added some homespun scarfs.

On some I added a cute little jingle bell or other embellishment that I had laying around.

Some I painted "believe" and "faith" and such on a little wood bead that I attached with rusty wire. Just to add a bit of character.

In the last few pics below, I dabbed on a bit of rosey red to their cheeks also.
And here's the after pics:


NOTE
I also added some round magnets on the backs of a few so you can hang them on the refrigerator. 

It's great to hold notes in the winter theme! I grabbed a pack of 52 round ones with strong hold from WalMart for around $3.00. Just glue them on with E-6000 glue and let dry! Strong Hold!

If you are mainly an online shopper for craft supplies, I've gotten some great deals on Amazon too.

See ya'll next time,
~Lisa

Update: 
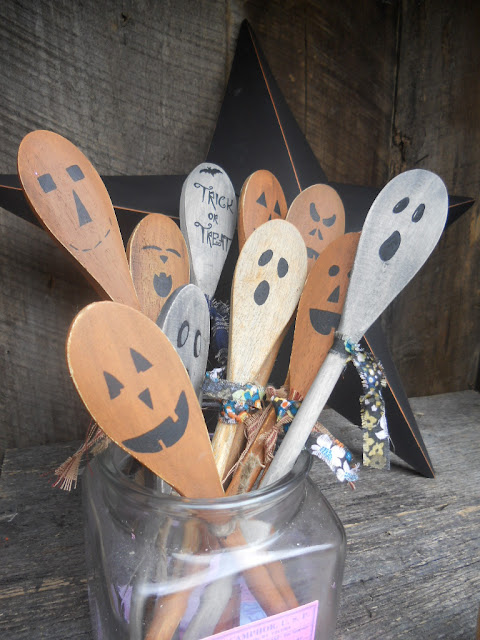
 Here's the newest Halloween themed spoons I have done so far.


Just kind of go wild with the faces and draw on things you would do to a real pumpkin.
Or like a few I did, write Trick or Treat on them with a pencil and then go back and either paint or use a black marker.
A few bats makes it cute as well.


 To spruce them up, I took some crafters wire and twirled it down their bodies.
And also tied a bit of twine at their necks.


These are for sale in my Booth #555 at the local o-op.
Cost: $1.99 each


*Here's a link to my most recent Kitchen themed wooden spoons*

Here's my latest use of these Pumpkin Wooden Spoons:

Halloween Mason Jar with Pumpkin Spoons

 HALLOWEEN THEMED MASON JARS with PUMPKIN SPOONS

See ya'll next time,
~Lisa