Sep 12, 2016

Ragball Pumpkins


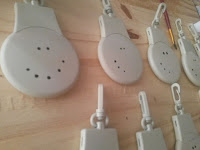
 I purchased a dozen of these drying rag balls, made by the Good Year car brand from the auction last Saturday for $2.00.  So I have about 16 or 17 cents in each.
They are made to use as a drying rag ball for windows and such.  But as soon as I saw them I had other plans. I pictured them as cute little primitive pumpkins because of their shape.

So as soon as I got home with them, I got out my 
-JUTE TWINE
-Manila Tag Labels
-Wooden Ice Cream Spoons
-Scissors
-Few Sprigs of Pip Berry Garland
-Old Crow Stamp and Ink
-Brown Craft Paint
I first painted my wooden ice cream spoons a brown color to make them look like little stems.
And I tied some jute string around them and just stuck them inside the little rag ball.

I noticed some had dis-colorization on the tops. I bet this is why they were cheaper.

Then I used the Manila tags, stamp and ink and stamped up some cute tags to tie on them.
I thought an ole crow would be Halloweenish~.

And then I just put it all together.


And I put them in a brownish/yellow colored enamel pan for display.


I think I am going to price these for $3.00 each in my local co-op craft booth.
Not a bad profit for an item that ended up costing me about 16 cents each! And I got a case of 12. 
I so wish I would've gotten more now! Ah, maybe next time.

What do ya' think? 
A fair price?

Happy Crafting ya'll,
See ya' next time,
~Lisa


Sep 8, 2016

SNOWMAN LID ORNAMENTS


Hey Ya'll, Morning!  
And warning, photo overload of snowmen!
I was lagging yesterday in the craft making department.  That is until I saw this craft made from metal jar lids and I immediately wanted to make some. So I got started and ended up making around 60. Yep, I'm tired of painting snowmen faces for a few days now. ;-)


Here's how I made them in case you want to give it a go.

I started out with a bunch of plain ole, metal Mason Jar lids in two sizes of
Regular: 2 2/4"
Wide Mouth: 3 3/4"
Some were new and shiny, some old and rusty. It doesn't matter to me.
And I spray painted them a base color in various shades of green and maroon that I had on hand.
The white was used for speckling (snow) only because it's a cheaper can and doesn't cover good.
Here are the Rustoleum and Valspar that cover great in one coat:


After they dry, they are a flat, softer color. Then we're ready to get started painting with craft paint.
My favorite brand is Folk Art but I do have a lot of Apple Barrel on hand too.

Just start by making various circles for the basic face shape of the snowman. 
I use Antique White as the color.

Sometimes I dab my brush, sometimes swirl.
Then just on to the dots for the eyes, and carrots for the noses.
When you think of them all as dots and such, it's easier for me to paint, rather than thinking, "oh I have to paint a face." Dots and carrots come easier. ;-)

 Click here for details on drawing snowman faces EASY


Oh and a I wanted to make a few in the cute blue that I had first found online, so I used a craft paint blue, in the closest color and just brushed it on for a few:


Here's a few more pics of the various ones I hand painted in whatever type of face came to mind at the time. 


And after what felt like a million snowman faces later,


a few candy canes,

 gingerbread men,


I decided to start adding the wire hangers.

I happened to have a metal punch on hand, but you can easily use a hammer and a nail to punch a hole in each side for a wire.


Two good hits, on a sturdy wood back is all it takes to get a good hole.


Here's the back. Oh yea, for some, I painted the backs a variety of colors, just to add a different, unique touch.


I used regular, thin gauge craft wire for the hangers. 


At first the wire was bright silver, 


but I didn't like it much, so after I cut it in strips, I spray painted them black.


I like the black much better.

And then after putting all the wires in and twirling the tips with a pencil so they wouldn't slip back through, I got out the homespun and pieces of Christmas garland.


And here is how they ended up turning out:


These are my absolute favorite of them all. The old blue looking ones.


These are now for sale in my local co-op craft booth and my ebay shop.
Happy Crating ya'll,
-Lisa

Sep 7, 2016

PRIMITIVE OUTLET SWITCH COVER MAKEOVERS

I recently won around 4 cases of these light switch covers at the auction.
I gave $10 a box and each box has 72 in it!
So I'm all set for a long time. Oh, did I mention that there are only two patterns?
Pink and Black Cheetah and Multi-color Cheetah?
Yep.

And I now have 4 cases of these! I can make these for every season!

Here's what I did to them.

 I just spray painted them in base colors of Rustoleum paints and then stenciled on some designs.
I finished them off with a clear, varnish sealer from Folk Art.

And I placed them back in the original packages to sell them in my craft booth at my local co-op.
I priced them for $2.00 each.

Hope this gives you an idea of something to do to plain ole' light switch covers.
You can buy them at Lowes or Walmart also.

See ya'll next time,
-Lisa